Englebright Lake Canoe Trek

Dates: June 14th-16th 2019
Uniform: Class A for Scouts and Leaders
Facilities: Toilets are available at campgrounds. Water is not available.

Attending

Use Scoutbook to RSVP

Meeting Location

Meeting Time: Friday June 14th @ 10:00 AM, Leaving at 10:30 AM
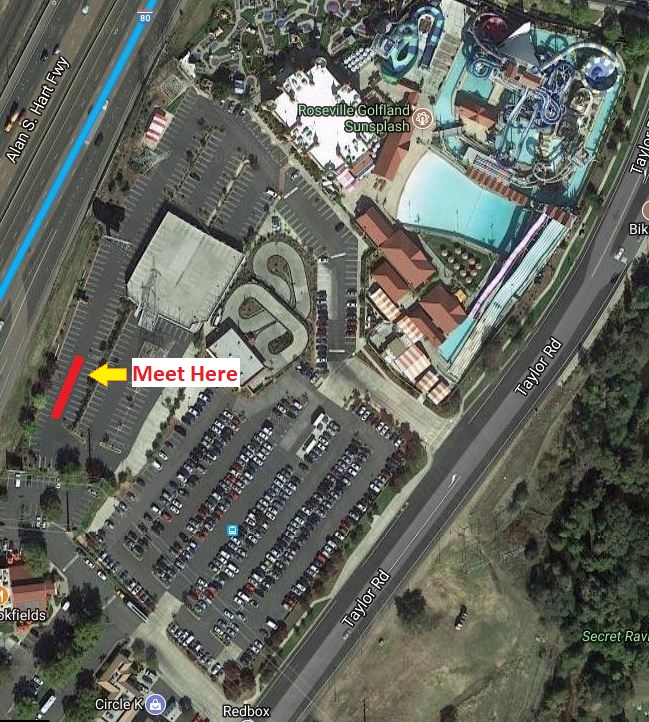
Meeting Place: Roseville Golfland Sunsplash Parking Lot (SW Corner - See Red Line in Image)
Pickup Time: Sunday June 16th @ 4:00 PM

Meeting Location Parking Lot

Travel Plan

Drivers are requested to supply the total number of comfortable seats in the vehicle (including the driver) to the travel coordinator.

Travel Unifrom

Scouts/Scouters should plan to wear their class A uniform: Class B uniforms are acceptable to wear at other times.

Driving Directions

The actual route will be determined the morning we meet.
Google Driving Directions to Skipper's Cove Marina

Canoe Assignments

NameCanoe 1Canoe 2Canoe 3Canoe 4Canoe 5Canoe 6Canoe 7
BH1      1
JC  1    1
CI 1     1
        
CA     1 1
EK    1  1
IH   1   1
JC  1    1
JI 1     1
JH1      1
LH      11
PI     1 1
SH    1  1
TN   1   1
TI 1     1
 232222114

Trip Preparation

  1. Scouts should form a team (2 to 3) and identify their canoe two weeks in advance of the trip.
    1. This will typically involve an older Scout teaming with a younger Scout.
    2. A single older Scout in a capsized boat and a single older Scout in a rescue boat is typically enough to right a boat, but they must be trained in advance.
    3. The more accomplished Scout will take the rear seat to start.
    4. Scouts will be able to change teams during any merit badge or water-play activities.
    5. Scouts are expected to change positions occasionally so that all Scouts on a team learn to paddle the different positions.
  2. Each boat team should coordinate what they plan to bring and how they pack to avoid duplicating gear and keep the number of buckets to a minimum.
    1. Each team should label their gear (especially buckets) so that it can be easily identified in the truck. Use colored tape, sharpie, or rope)
    2. Each team should plan their meals and gear to avoid duplication and over-packing. Due to the ice-chest, Scouts are encouraged to eat well.
    3. Five gallon buckets are only required to store gear that needs to stay dry. Tents and chairs are generally OK to get wet because they dry quickly.
    4. A canoe can typically carry 750 lbs, so full-size ice chests are fine, but should carry multiple teams' food.
  3. Meal planning should be coordinated by Patrol, however, smaller groups should plan meals together.
    1. There is no running water at the camping areas. Plan to bring one gallon per person per day and at least one water filter per patrol.
    2. Feel free to pack a lightweight or larger Coleman stove
    3. Feel free to plan steak, hamburgers, hot dogs, or other more involved meals since ice-chests and stoves are available and weight is not much of an issue
    4. Coordinate condiments flatware, bowls, and plates with other Patrols
    5. Always bring kitchen-sized trash bags because all trash must be packed out.
    6. A sack lunch is typically required for the day we leave
    7. Money for lunch is typically required the day we return.
  4. Proper clothing makes the difference between a miserable trip and a pain-free adventure. The water is close by, so you don't need to worry about being too warm.
    1. Closed-toe shoes are required. Flip-flops, slides, bare feet, and sandals are not acceptable at any time. (Required) Ideally bring shoes that drain well and dry fast. (Recommended)
    2. Everyone must have a lifejacket. We will be borrowing some life jackets, however, if you are not in a mid-range size, be prepared to provide your own.
    3. Bring one pair of dark sunglasses with a strap that floats the glasses well, or ideally has a block of high-visibility foam threaded through the strap. Sunglesses prevent damage to your eyes and allow rescuers to look into the reflecting sun during a rescue. (Required)
    4. Bring a wide-brimmed hat that blocks the sun and has a strap to keep it on in the wind. The wind is generally blowing up-river into your face. (Required)
    5. Bring Sunscreen/sunblock. The sun will reflect off of the water so you must protect under your chin, all the way to the brim of your hat, your ankles, and anywhere else that skin is exposed. (Required)
    6. Bring at least one long-sleeved, synthetic, quick-drying, sun-blocking shirt. (Recommended)
    7. Bring at least one pair of long-legged, synthetic, quick-drying, sun-blocking pants. (Recommended)
    8. Paddling gloves (thin, cheap synthetic woven gloves. Try Harbor Freight.) can prevent blisters from forming. Not wrapping your thumb around the paddle also prevents blisters. (Recommended)
    9. A foam gardening pad or a throwable safety cushion from a boat makes the seat of a canoe more comfortable. Perhaps combining the mat with a small, all-fabric stadium seat would be best to provide some back support. The seat bottom must grip the plastic seat in the canoe and not slide, so metal won't work. (Recommended)
  5. Please label everything you bring as it's easy to mix things up when a canoe swamps.

Canoe Packing Procedures

All items in the canoe must be secured except for a few noted exceptions.
  1. Secure one ice chest per canoe, although the longer canoes can support two. 16+ foot canoes or larger are recommended, although "untippable" wide canoes as short as 14 feet can carry an ice chest.
  2. Teams will need to pack canoes to accommodate Troop gear as well as their own. This should be determined in advance.
  3. Each ice chest must have it's own ratchet strap to keep the lid closed if the canoe tips. Ice chests exposed to the water will partially fill with dirty water. All food must be wrapped to protect it from dirty water.
  4. Ice chests are loaded into the canoe first next to thwarts. This can often be done before the canoe is launched and carried a short distance to the water.
  5. Buckets are typically secured on both sides of the ice chest.
  6. Gear will be secured to the thwarts that run from gunnel to gunnel on the canoe.
  7. The best way to secure gear is to use a latching or buckling lashing strap that runs through the ice chest ratchet strap around a thwart and through the handles of each bucket or dry bag. This lashing strap should be quite loose because if the canoe is tipped, you want the gear to flop out to the sides of the canoe to make it easier to right by pushing all of the floating gear to one side.
  8. Use carabiners to make items more accessible when attached to the lashing straps. Carabiners are useful for attaching water tight camera boxes, water bottles, backpacks, and ice chests to the lashing straps.
  9. The only items that don't need to be secured to the boat are: extra paddles, sponges, and bailing devices that float.

Busy Boat Launching Ramp Instructions

This section is based on lessons learned during previous trips. The boat launching ramp is the most dangerous place the Scouts will see during any canoe trek. The goal is to leave the boat launch area as quickly as possible. Clearing the area quickly is done for both safety reasons and to show courtesy towards other boat ramp users. The ideal situation involves the Scouts moving all canoes and gear and the adults looking out for unsafe conditions.
  1. Each boat team is responsible for ensuring that their activities are productive and safe in the boat-launching area.
    1. Scouts should apply sunscreen prior to travel to avoid delays on the ramp.
    2. Scouts should travel with their life jackets and must wear a life jacket as soon as they arrive at the put-in with their boat.
    3. Each team should prioritize finding their paddles and retrieving their canoe from the trailer and bringing it down to the least used portion of the dock (typically the side opposite the working-side of the boat ramp.
    4. Teams should remove all of their gear from the vehicles they rode in when exiting the vehicle, because all vehicles will be unloaded and moved to a distant location as soon as possible.
    5. Teams should work with each other so that we can get under-weigh as soon as possible; this is not a competitive event.
  2. Each boat team is OK to shove-off to a location that is away from the dock and away from boating lanes only when:
    1. Each Scout is properly wearing a life-jacket.
    2. Each Scout on the team is situated in their spot in the canoe.
    3. All gear is secured with lashing straps in the canoe.
    4. Each scout has a paddle.
    5. All gear is accounted for.
    Boat teams should wait patiently, assist other teams where possible, and practice their strokes while waiting. Avoid play at this time as there will be plenty of time later and we want to avoid tipping any canoes. Stay within visual and vocal range to assist leaders when necessary.
  3. Once under-weigh, canoes must stay in pairs, to ensure that a water rescue can take place safely.
    1. Boat pairs should never be more than 30 seconds paddle distance apart on flat-water and as close as is safe on fast water.
    2. Boats will pair up after each trek starts so that skill levels can be matched: A capable team with a less capable team is the goal.
    3. When taking gear from one location to another, the goal should be to avoid activities that risk tipping the canoes.
    4. During skill and play activities, do not hit or tip other canoes. You may tip your own canoe because learning canoe rescues is good practice. Make sure another canoe is close by and aware of your intent and that you are not in fast water or about to be in fast water.

Specialty Equipment

Canoe Treking can be accomplished spending a minimal amount of money. Canoes can be borrowed, wetsuits can be borrowed or bought used on Craigslist or Facebook Marketplace. A Scout is thrifty. This section provides some tips on items specific to float trips.

The 5 Gallon Bucket

It's always possible to swamp a boat, so it would be wise to try to waterproof your gear. The least expensive way to waterproof your gear is to use 5 gallon buckets with air-tight lids. There are two styles that I have seen, a two-part seal and screw-off lid, and a push-down sealing lid. Either of these will work, however the two-part style is easiest to get into. With the two-piece lid one part of the lid presses down over the bucket, while the second part screws down into the first part. The single-part press-down lid requires a lid-lifter tool to open. OK, I will say that there is a third type of screw-down sealing lid, however, I will warn you that they can be very difficult to open after temperature changes. I don't recommend them.

Not all gear needs to be waterproofed however. Separating out gear that needs to be water-proofed, from gear that doesn't can help reduce the number of two-part lids that you need to buy. Also, separating gear that only needs to be accessed twice a day can lower your expenses by choosing a less expensive lid for those items. Make sure that you buy buckets with handles and that you know how to open and close your buckets properly before the trip.
Two-piece lid
Two-piece 5 gallon bucket lid

The Dry Bag

Dry bags come in various sizes and styles, but are essentially a plastic or rubber bag with a opening that is folded over three times and secured with a buckle. Generally, these bags are pretty expensive. They work, but must be sealed correctly. They always seem to leak because they are easily ripped or punctured by the most innocuous things - like sleeping bag zippers. Because they are more expensive, more difficult to seal correctly, and can fail in ways that are hard to see, I prefer the 5 gallon bucket. It is hard to beat the pure awesomeness of the 5 gallon bucket. They are inexpensive, float well, are high-visibility, can be used to store dry food and clean water, have a handle, and are difficult to puncture. I have dry bags. Sometimes I put them in 5 gallon buckets to keep them dry.

The Zip-lock Bag

Don't do it. If you go this route to protect a wallet or cell phone, just know that there is a good chance that the baggie will not stay waterproof for very long, if at all. Even double or tripple bagging is often not sufficient protection. Sandwich bags leak, so we're only considering the freezer bags. Test them first, then go to WalMart and buy a <$10 plastic dry box with a silicone seal.

The Lashing Strap

A 6 to 8 foot lashing strap is used to secure items in the canoe to the thwarts of the canoe in case of the canoe being tipped over. The strap should be kept loose enough so that items secured to the gunnel are allowed to flop out to one side of the canoe. It's necessary that all items stay attached to the canoe in the case of a rescue. The last thing that anyone needs to be concerned with during a fast water rescue is securing a bunch of gear floating down the river. In fact, everyone will be instructed to ignore that gear until such a time as the safety is accomplished. Look for "Outdoor Products Lashing Strap - 6 FT" or try the outdoor section of WalMart. The strap will have a buckle so that it can be quickly connected and disconnected during a rescue. The easiest way to connect gear to the lashing strap is through the bucket or dry bag handle. It's even easier if a carabiner is used to connect items to the strap if those items will be used while the boat is underweigh (ice chests, backpacks, watter bottles, water-tight camera cases, etc.).

The Painter

The painter line is a mandatory 15 foot lead rope secured to the front of every canoe. 3/8" braided polypropylene rope is best (try Harbor Freight). The purpose of the painter is to tie up the canoes at night, to use to tow a boat during retrieval, as a safety line during rescues, for tying boats to one another, and for other similar purposes. Do not use this line to secure gear to the canoe as that will make the line less useful. The line is then stored in the bow of the canoe when not in use. Most of the time when canoes are borrowed, they will not have a painter attached. You'll need to supply one in advance of the trip.

To prepare the line, tie a loop using a half knot at one end of the line. Pass the line through the canoe's handle or lead line hole and then through the loop to create a slip knot.

The Carabiner

Originally used by climbers, the discount stores now carry weak versions of these useful shackles for attaching gear to the straps on the canoe. The wire-close carabiners are useless; if you go inexpensive, at least make sure that that there is a aluminum arm closing the carabiner.

Never confuse the cheap ones for the real thing. The cheap ones will not support more than 20 lbs, while the real thing will support hundreds of pounds. For attaching your gear, use the inexpensive parts, but for rescuing pinned canoes and people, the real thing is required.

The Throw Bag

For fast-water treks, a throw bag is a safety line stored in a bag with an attached carabiner that is weighted so that it can be easily thrown in the case of a water rescue. It should not be used for any other purpose, and once deployed, care must be taken to reset the rope correctly to facilitate another use.

The Wetsuit

For fast-water treks, or early-season canoeing, a wet-suit is required to prevent hypothermia in the water. If the water is below 65 degrees, a wet-suit id required. A wet-suit is required on any Sacramento River trip during any season of the year. Anyone interested in performing activities from the Canoeing merit badge may want to bring a wet suit. As part of the merit badge activities, Scouts will spend at least 15 minutes in the water

Float Plan

CPR Certified Person:
Safety Afloat and Safe Swim Trained:
Leader 1:
Leader 2:
Shore Contact: Ryan Braaten, USACE Park Ranger (Call 911 for emergencies)

Schedule of Activities

June 14th
10:00 PM Meet at Roseville Golfland Sunsplash Parking Lot
10:30 Depart for Skipper's Cove Marin at Englebright Lake
12:00-12:30 PM Park Vehicles and Pay for Parking ($5 per vehicle)
1:00 PM Launch Canoes
3:00 PM Arrive at Campsites
     There are no reservations at this lake so we will need to find campsites (Max 8 people per site)
3:00 PM - 4L00 PM Setup Camp 6:00 PM Evening Meal
10:00 PM Light's Out

June 15th
7:00 AM Reville
9:00 - 12:00 PM Environmental Service Project
12:00 PM Midday Meal 1:00 PM Canoe Games / Canoeing Activities 6:00 PM Evening Meal
10:00 PM Light's Out

June 16th
7:00 AM Reville
9:00 AM Depart for Skipper's Cove Marina (Wind picks up: the later you start, the more difficult it becomes)
12:00 PM Arrive Skippers Cove and Load up Canoes and Vehicles
1:30 PM Depart for Roseville 4:00 PM Arrive at Roseville Golfland Sunsplash Parking Lot

Maps and Links

Englebright Lake Website
Englebright Lake Map Showing Campsites (PDF)
Englebright Lake Map (Google)

2019 Englebright Lake Canoe Trek Statistics

Day Miles Avg Mov Spd Duration Start Finish
 
1 - Skippers Cove to Longs Point2.732.31 hrs 12 mins2:39 PM3:51 PM
2 - Longs Point to Point Defiance4.041.523 hrs 11 mins10:22 AM1:33 PM
2 - Point Defiance to Covered Bridge View.8261.740 hrs 34 mins1:33 PM2:07 PM
2 - Covered Bridge View to Point Defiance.8264.040 hrs 29 mins2:21 AM2:50 PM
2 - Point Defiance to Longs Point4.042.32 hrs 7 mins2:50 PM4:29 PM
3 - Longs Point to Skippers Cove2.981.32 hrs 15 mins9:37 AM6:42 PM
All15.401.858 hrs 45 mins  


Photos and Video

Quadrotor Video
9-8-2012 Englebright Lake